はじめに
認証認可について理解が浅かったので、Auth0 のチュートリアルをやってみた時の備忘。
基本的には下記のリンク先に書いてある通りのことをやったのみとなる。
RFC 6749 では、アクセストークンを取得するための Authorization Code, Implicit, Resource Owner Password Credentials, Client Credentials の 4 つのフローが定義されている。
このチュートリアルでは Client Credentials フローで実行する形となる。
Client Credentials Flow
RFC 6749 の 4.4. Client Credentials Grant の項目で定義されているフロー。
認可サーバーここでは Auth0)の API エンドポイント(にリクエストを投げて、そのレスポンスでアクセストークンを受け取る。
ユーザー認証自体は行われず、リクエスト元となるクライアントの認証のみ行うような形となるやり方になる。
環境
- Auth0 アカウント (Auth0 のアカウントを作成しておく)
- Go 1.19 (認可に利用するテスト用の API 用)
Auth0 の設定
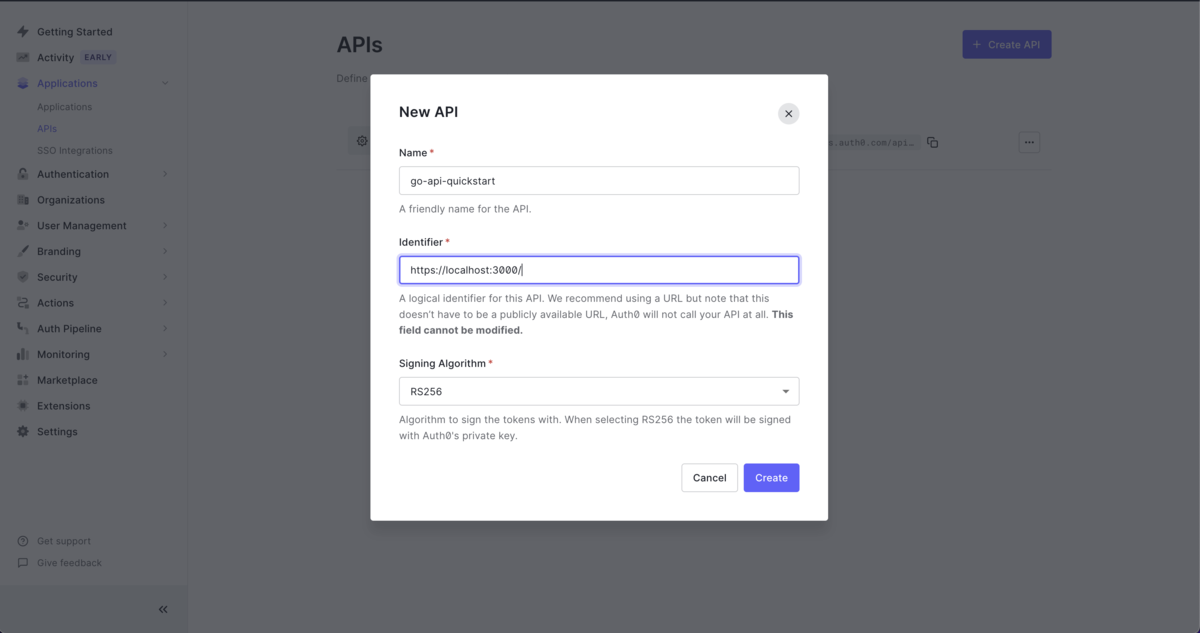
Auth0 の APIs に、自分が作成する API アプリケーションを示す情報を登録する。
値は何でも良いけど Identifier の値は、認可リクエストで利用することになり、後の変更不可なので注意。
APIs の項目に遷移し、 Permission を定義する。
チュートリアルの通りに、 Permission に read:messages を、 Description に read messages としておく。

Settings で、 RBAC Settings の項目から、 Enable RBAC と Add Permissions in the Access Token を有効化し、画面下の Save ボタンをクリックする。これでアクセストークンに Permissions の項目が含まれるようになる。

Applications の項目に遷移し、 APIs タブの画面で、Permissions から、先ほど作成した read:messages にチェックを入れ、画面下の Update ボタンをクリックして更新する。

API 環境作成
モジュール用ディレクトリ作成
モジュール用ディレクトリを作成する。
% mkdir auth0-go
そのディレクトリに移動して、 go mod init を実行する。
% cd auth0-go
モジュールの初期化
go mod init を実行してモジュールを初期化する。
必要に応じて引数としてモジュール名(ここでは localhost/auth0-go としているが任意)を指定する。
% go mod init localhost/auth0-go
.env ファイル作成
Auth0 の各種パラメータを定義した .env ファイルを作成する。
% cat .env
# Auth0 テナント ドメインの URL。
# カスタム ドメインを使用している場合は、そのドメインを設定する。
AUTH0_DOMAIN='********.{Region}.auth0.com'

# API の AUDIENCE
AUTH0_AUDIENCE='https://localhost:3000/'  # <- Auth0の
自己証明書作成
% openssl req -x509 -newkey rsa:4096 -sha256 -days 3650 -subj "/C=JP" -nodes -keyout server.key -out server.crt
アプリケーション作成
auth0-go 直下に middleware ディレクトリを作成し、 jwt.go を作成する。
Auth0 のライブラリを使ってアクセストークンを検証する処理を記述する。
以下では JWKS (Json Web Key Set)を使うようにしている。
JWKS についてはまだあまり詳しく理解できていないが、 https://{Auth0テナント名}.us.auth0.com/.well-known/jwks.json の情報をもとに KeyFunc の値を生成して、この値を JWT の検証に利用するもの、と思っている。
JWKS を使わない場合は Auth0 の APIs の Signing Secrets の値を KeyFunc へセットするようにし、JWT の検証を行う。
KeyFunc というのが一般的な用語なのかもわかってないけど go-jwt-middleware のパッケージでは KeyFunc という名称のものを利用している。
package middleware

import (
    "context"
    "log"
    "net/http"
    "net/url"
    "os"
    "strings"
    "time"

    jwtmiddleware "github.com/auth0/go-jwt-middleware/v2"
    "github.com/auth0/go-jwt-middleware/v2/jwks"
    "github.com/auth0/go-jwt-middleware/v2/validator"
)

// CustomClaims contains custom data we want from the token.
type CustomClaims struct {
    Scope string `json:"scope"`
}

// Validate does nothing for this example, but we need
// it to satisfy validator.CustomClaims interface.
func (c CustomClaims) Validate(ctx context.Context) error {
    return nil
}

func (c CustomClaims) HasScope(expectedScope string) bool {
    result := strings.Split(c.Scope, " ")
    for i := range result {
        if result[i] == expectedScope {
            return true
        }
    }

    return false
}

// EnsureValidToken is a middleware that will check the validity of our JWT.
func EnsureValidToken() func(next http.Handler) http.Handler {
    issuerURL, err := url.Parse("https://" + os.Getenv("AUTH0_DOMAIN") + "/")
    if err != nil {
        log.Fatalf("Failed to parse the issuer url: %v", err)
    }

    provider := jwks.NewCachingProvider(issuerURL, 5*time.Minute)

    jwtValidator, err := validator.New(
        provider.KeyFunc,
        validator.RS256,
        issuerURL.String(),
        []string{os.Getenv("AUTH0_AUDIENCE")},
        validator.WithCustomClaims(
            func() validator.CustomClaims {
                return &CustomClaims{}
            },
        ),
        validator.WithAllowedClockSkew(time.Minute),
    )
    if err != nil {
        log.Fatalf("Failed to set up the jwt validator")
    }

    errorHandler := func(w http.ResponseWriter, r *http.Request, err error) {
        log.Printf("Encountered error while validating JWT: %v", err)

        w.Header().Set("Content-Type", "application/json")
        w.WriteHeader(http.StatusUnauthorized)
        w.Write([]byte(`{"message":"Failed to validate JWT."}`))
    }

    middleware := jwtmiddleware.New(
        jwtValidator.ValidateToken,
        jwtmiddleware.WithErrorHandler(errorHandler),
    )

    return func(next http.Handler) http.Handler {
        return middleware.CheckJWT(next)
    }
}
auth0-go 直下に main.go を作成する。
テスト用に3本のAPI ( /api/public, /api/private, /api/private-socped ) を定義している。
package main

import (
    "fmt"
    "log"
    "net/http"

    jwtmiddleware "github.com/auth0/go-jwt-middleware/v2"
    "github.com/auth0/go-jwt-middleware/v2/validator"
    "github.com/joho/godotenv"

    "localhost/auth0-go/middleware"
)

func main() {
    if err := godotenv.Load(); err != nil {
        log.Fatalf("Error loading the .env file: %v", err)
    }

    router := http.NewServeMux()

    // This route is always accessible.
    router.Handle("/api/public", http.HandlerFunc(func(w http.ResponseWriter, r *http.Request) {
        w.Header().Set("Content-Type", "application/json")
        w.WriteHeader(http.StatusOK)
        w.Write([]byte(`{"message":"Hello from a public endpoint! You don't need to be authenticated to see this."}`))
    }))

    // This route is only accessible if the user has a valid access_token.
    router.Handle("/api/private", middleware.EnsureValidToken()(
        http.HandlerFunc(func(w http.ResponseWriter, r *http.Request) {
            // CORS Headers.
            w.Header().Set("Access-Control-Allow-Credentials", "true")
            w.Header().Set("Access-Control-Allow-Origin", "https://localhost:3000")
            w.Header().Set("Access-Control-Allow-Headers", "Authorization")

            w.Header().Set("Content-Type", "application/json")
            w.WriteHeader(http.StatusOK)
            w.Write([]byte(`{"message":"Hello from a private endpoint! You need to be authenticated to see this."}`))
        }),
    ))

    router.Handle("/api/private-scoped", middleware.EnsureValidToken()(
        http.HandlerFunc(func(w http.ResponseWriter, r *http.Request) {
            w.Header().Set("Content-Type", "application/json")

            token := r.Context().Value(jwtmiddleware.ContextKey{}).(*validator.ValidatedClaims)
            fmt.Println(token)

            claims := token.CustomClaims.(*middleware.CustomClaims)
            fmt.Println(claims)
            if !claims.HasScope("read:messages") {
                w.WriteHeader(http.StatusForbidden)
                w.Write([]byte(`{"message":"Insufficient scope."}`))
                return
            }

            w.WriteHeader(http.StatusOK)
            w.Write([]byte(`{"message":"Hello from a private endpoint! You need to be authenticated to see this."}`))
        }),
    ))

    log.Print("Server listening on https://localhost:3000")

    srv := &http.Server{
        Addr:    "localhost:3000",
        Handler: router,
    }
    if err := srv.ListenAndServeTLS("server.crt", "server.key"); err != nil {
        log.Fatalf("There was an error with the http server: %v", err)
    }
}
Client Credentials Flow を試す。
Access Token Request
Auth0 のマネジメント API (/oauth/token)へリクエストし、アクセストークンを取得する。
client_id と client_secret パラメータは、 Applications の Settings 画面から値を確認してセットする。
% curl --request POST \
  --url https://********.{Region}.auth0.com/oauth/token \
  --header 'content-type: application/json' \
  --data '{"client_id":"xxxxxxxx","client_secret":"xxxxxxxx","audience":"https://localhost:3000/","grant_type":"client_credentials"}'
Access Token Response
以下のような形で結果が返って来れば成功となる。
{"access_token":"****...****","expires_in":86400,"token_type":"Bearer"}%
取得したアクセストークンを用いて、作った API へリクエストする。
~ % curl --request GET -k --url https://localhost:3000/api/private-scoped --header 'Authorization: bearer ****...****'
下記のような結果が返されれば正常なリクエストが実行できている。
{"message":"Hello from a private endpoint! You need to be authenticated to see this."}%
~ % curl --request GET -k --url https://localhost:3000/api/private --header 'Authorization: bearer ****...****z'
JWT の検証でエラーが返される。
{"message":"Failed to validate JWT."}%
Applications の項目に遷移し、 APIs タブの画面で、Permissions から、先ほど作成した read:messages にチェックを外し、画面下の Update ボタンをクリックして更新した状態で、再度アクセストークンを取得し、そのアクセストークンを使ってリクエストする。
~ % curl --request GET -k --url https://localhost:3000/api/private-scoped --header 'Authorization: bearer ****...****'
以下のようなエラーが返され、きちんと Permission の検証が行われている正常な動作を確認できる。
{"message":"Insufficient scope."}%
まとめ
Auth0 のチュートリアルをやって Client Credentials Flow の認可の仕組みに触れた。 認可の仕組みにいろいろなやり方があることをわかっていなかったので、その辺りの理解が深まったのと、実際に Client Credentials Flow で動かしてみて処理の流れが掴めたのはよかった。
参考
- Auth0 Go API SDK Quickstarts: Authorization
- Auth0 Go API SDK Quickstarts: Add authorization to a Go API
- Server Apps + API: Node.js Implementation for the API
- Get Management API Access Tokens for Production
- ID Token and Access Token: What Is the Difference?
- Auth0
- JWKS
- jwks package - github.com/auth0/go-jwt-middleware/v2/jwks - Go Packages
- GitHub - MicahParks/compatibility-keyfunc: Create a jwt.Keyfunc for JWT parsing with a JWKS or given cryptographic keys in Golang. LEGACY FORKS ONLY. Use https://github.com/MicahParks/keyfunc for github.com/golang-jwt/jwt
- go-jwt-middleware/validator/validator.go at v2.0.1 · auth0/go-jwt-middleware · GitHub
- JSON Web Key (JWK)
- jwt package - github.com/golang-jwt/jwt/v4 - Go Packages
- 多分わかりやすいOAuth | SIOS Tech. Lab