はじめに
前回、Mac OS X 10.7.5 (LION)へRubyをインストールしました。
今回はそこにRuby on Rails環境を構築して、簡易Webアプリ作成し、動作させてみました。
環境
インストール環境
インストール環境は以下です。
| プラットフォーム | Macbook Air |
| OS | Mac OS X 10.7.5 |
利用するソフトウェア
Ruby on Railsを利用するためにはWebサーバ、データベースが必要となります。
今回はWebサーバにMac OS Xに標準で付属されているApache、データベースにはMySQLを利用します。
| ミドルウェア | バージョン | 備考 |
|---|---|---|
| Apache | 2.2.22 | OS X 付属Webサーバ |
| MySQL | 5.5.29 | DBサーバ |
| Ruby | 1.9.3-p327 | Rubyプログラミング言語(rbenv管理) |
| RubyGems | 1.8.23 | Rubyのパッケージ/ライブラリ管理ツール |
| Rails | 3.2.11 | Ruby on Rails フレームワーク |
※Rails用Webサーバ
Railsに利用されるWebサーバとしては主に以下があります。
細かいアーキテクチャについては記載していませんが、最近ではPassengerかUnicornの利用が主流なようです。
- WEBrick Rubyに標準で付属されているHTTPサーバ。低速ですがテスト等で利用するのであれば十分かもしれません。
- Mongrel RubyとCライブラリで書かれたWEBrickより高速に動作するHTTPサーバ。かつては多く利用されていたようです。
- Thin Mongrelのコードを元に開発された高速で軽量なHTTPサーバ。WEBRickの代替として用いられることが多いようです。
- Unicorn 主にRubyで開発されている高速なHTTPサーバ。カスタマイズ性や拡張性が高い。
- Passenger 高速、高機能なHTTPサーバ。Apache/Nginxの拡張モジュールとして利用される。
Mongrelやthin、Unicornでは、動作を高速にさせるためにリバースプロキシを利用し、リクエストの内、静的なファイルへのリクエストはリバースプロキシで処理させ、それ以外のリクエストについてはMongrelやthin、Unicornで処理させる構成となるのが一般的です。
対して、Passengerでは、外部からのリクエストは全てApacheで処理されます。設定ファイルや起動/停止の制御、プロセス監視などをApacheのみで管理できる点がメリットであると思います。
手順
実施した内容は以下になります。
Railsの環境構築
RailsはRubyGems(Rubyのパッケージ管理システム)からインストールを行います。
RubyGemsのツールはRuby 1.9.1以降では標準で含まれているので、特にインストールは不要です。
Railsのインストール
まず最初にRubyGemsのライブラリ郡を最新化します。
% gem update
Railsをインストールします。
% gem install rails
環境変数を再読み込みします。
% source ~/.zshrc
以下の通りRailsがインストールされていることが確認できます。
% which rails
/Users/xxxxx(ユーザ名)/.rbenv/shims/rails
% rails -v
Rails 3.2.11
Apacheの環境構築と設定
Passion Passengerのインストール
RubyGemsからPassion Passengerをインストールします。
% gem install passenger
PassengerのApacheモジュールのインストール
PassengerのApacheモジュールをインストールします。
% passenger-install-apache2-module
※不足しているモジュールやパッケージがあればエラーとなりますが、出力されるエラーメッセージ内に不足パッケージ類のリストとそのインストール手順が表示されますので、それに従ってインストールします。
※インストールが正常に行われると、最後に以下のようなPassengerを読み込むために追加すべきApacheの設定内容が表示され、さらに[Enter]キーを押下すると、virtualhostの設定のサンプルが表示されますので、これらのメッセージはメモしておくと良いです。
...
--------------------------------------------
The Apache 2 module was successfully installed.

Please edit your Apache configuration file, and add these lines:

   LoadModule passenger_module /Users/xxxxx(ユーザ名)/.rbenv/versions/1.9.3-p362/lib/ruby/gems/1.9.1/gems/passenger-3.0.19/ext/apache2/mod_passenger.so
   PassengerRoot /Users/xxxxx(ユーザ名)/.rbenv/versions/1.9.3-p362/lib/ruby/gems/1.9.1/gems/passenger-3.0.19
   PassengerRuby /Users/xxxxx(ユーザ名)/.rbenv/versions/1.9.3-p362/bin/ruby

After you restart Apache, you are ready to deploy any number of Ruby on Rails
applications on Apache, without any further Ruby on Rails-specific
configuration!

Press ENTER to continue.
--------------------------------------------
Deploying a Ruby on Rails application: an example

Suppose you have a Rails application in /somewhere. Add a virtual host to your
Apache configuration file and set its DocumentRoot to /somewhere/public:


      ServerName www.yourhost.com
      # !!! Be sure to point DocumentRoot to 'public'!
      DocumentRoot /somewhere/public

         # This relaxes Apache security settings.
         AllowOverride all
         # MultiViews must be turned off.
         Options -MultiViews


And that's it! You may also want to check the Users Guide for security and
optimization tips, troubleshooting and other useful information:

  /Users/shimizu/.rbenv/versions/1.9.3-p362/lib/ruby/gems/1.9.1/gems/passenger-3.0.19/doc/Users guide Apache.html

Enjoy Phusion Passenger, a product of Phusion (www.phusion.nl) :-)
https://www.phusionpassenger.com

Phusion Passenger is a trademark of Hongli Lai & Ninh Bui.
Apacheのバーチャルホストの設定
Apacheのバーチャルホストのconfファイルを新規に作成し、設定を行います。ここでは自分のホームディレクトリ配下に/wwwを作成し、それをドキュメントルートとしました。
デフォルトで準備されている他のファイルをあまり編集したくなかったので、ここでは/etc/apache2/users配下へtest.confという名称で設定ファイルを新規に作成しています。
※バーチャルホストの設定ファイルは/etc/apache2/extra配下にありますので、それを利用するなどでも構いません。
% mkdir /Users/xxxxx(ユーザ名)/www
% cd /etc/apache2/users
% sudo vim test.conf
### 設定例
NameVirtualHost *:80

  ServerName localhost
  DocumentRoot /Users/xxxxx(ユーザ名)/www


    Options Indexes MultiViews
    AllowOverride None
    Order allow,deny
    Allow from all
続いてPassenger用のApache設定ファイルを作成します。ここではpassenger.confという名称の設定ファイルを作成しました。
Passengerをインストールした際に出力されたメッセージを元に設定を行います。RailsとApacheを連携させるために"RailsEnv"、"RailsBaseURI"ディレクティブの指定も行う必要があります。
% cd /etc/apache2/users
% sudo vim passenger.conf
### 設定例
LoadModule passenger_module /Users/xxxxx(ユーザ名)/.rbenv/versions/1.9.3-p362/lib/ruby/gems/1.9.1/gems/passenger-3.0.19/ext/apache2/mod_passenger.so
PassengerRoot /Users/xxxxx(ユーザ名)/.rbenv/versions/1.9.3-p362/lib/ruby/gems/1.9.1/gems/passenger-3.0.19
PassengerRuby /Users/xxxxx(ユーザ名)/.rbenv/versions/1.9.3-p362/bin/ruby

RailsEnv development
RailsBaseURI /testapp/public


      # This relaxes Apache security settings.
      AllowOverride all
      # MultiViews must be turned off.
      Options -MultiViews
全ての設定が完了したら、Apacheを再起動します。
% sudo apachectl restart
以上でApacheの設定は完了です。
MySQL環境構築
MySQLの環境を構築します。
MySQLのインストール
MySQLのインストール方法はいろいろありますが、ここではhomebrewから行います。
% brew install mysql
インストール時に以下の通り初期セットアップの手順が出力されますので、参考にメモしておきます。
Set up databases to run AS YOUR USER ACCOUNT with:
    unset TMPDIR
    mysql_install_db --verbose --user=`whoami` --basedir="$(brew --prefix mysql)" --datadir=/usr/local/var/mysql --tmpdir=/tmp

To set up base tables in another folder, or use a different user to run
mysqld, view the help for mysqld_install_db:
    mysql_install_db --help

and view the MySQL documentation:
  * http://dev.mysql.com/doc/refman/5.5/en/mysql-install-db.html
  * http://dev.mysql.com/doc/refman/5.5/en/default-privileges.html

To run as, for instance, user "mysql", you may need to `sudo`:
    sudo mysql_install_db ...options...

A "/etc/my.cnf" from another install may interfere with a Homebrew-built
server starting up correctly.

To connect:
    mysql -uroot

To have launchd start mysql at login:
    ln -sfv /usr/local/opt/mysql/*.plist ~/Library/LaunchAgents
Then to load mysql now:
    launchctl load ~/Library/LaunchAgents/homebrew.mxcl.mysql.plist
Or, if you don't want/need launchctl, you can just run:
    mysql.server start
?  /usr/local/Cellar/mysql/5.5.29: 6389 files, 210M
環境変数を再度読み込み、PATHを通します。
% source .zshrc
以下の通りインストールされていることが確認できます。
% mysql --version
mysql  Ver 14.14 Distrib 5.5.29, for osx10.7 (i386) using readline 5.1
MySQLの初期設定
MySQLデータを初期化し、システムテーブル(MySQL権限テーブル)を作成します。
システムテーブルのデータはデータディレクトリ内(datadir)に格納され、mysqldは起動後にデータディレクトリ内のデータにアクセスするため、mysqldを実行するのと同じアカウントでmysql_install_dbを実行する必要があります。
データディレクトリの配置先などに特に問題がなければ、先のmysqlインストール時に表示された内容でそのまま処理を実行して問題ありません。
$ unset TMPDIR
$ mysql_install_db --verbose --user=`whoami` --basedir="$(brew --prefix mysql)" --datadir=/usr/local/var/mysql --tmpdir=/tmp

when specifying MySQL privileges !
Installing MySQL system tables...
OK
Filling help tables...
OK
※以下のようにパスワードの設定手順などが表示されますので必要であればメモしておきます。
To start mysqld at boot time you have to copy
support-files/mysql.server to the right place for your system

PLEASE REMEMBER TO SET A PASSWORD FOR THE MySQL root USER !
To do so, start the server, then issue the following commands:

/usr/local/opt/mysql/bin/mysqladmin -u root password 'new-password'
/usr/local/opt/mysql/bin/mysqladmin -u root -h MacBook-Air password 'new-password'

Alternatively you can run:
/usr/local/opt/mysql/bin/mysql_secure_installation

which will also give you the option of removing the test
databases and anonymous user created by default.  This is
strongly recommended for production servers.

See the manual for more instructions.

You can start the MySQL daemon with:
cd /usr/local/opt/mysql ; /usr/local/opt/mysql/bin/mysqld_safe &

You can test the MySQL daemon with mysql-test-run.pl
cd /usr/local/opt/mysql/mysql-test ; perl mysql-test-run.pl

Please report any problems with the /usr/local/opt/mysql/scripts/mysqlbug script!
MySQLサーバを起動させます。
% mysql.server start
Starting MySQL
.. SUCCESS!
rootのパスワードを設定します。
shimizu@MBA /Users/shimizu% mysqladmin -u root password
New password:
Confirm new password:
MySQLサーバにログインします。
% mysql -u root -p
Enter password:
Welcome to the MySQL monitor.  Commands end with ; or \g.
Your MySQL connection id is 2
Server version: 5.5.29 Source distribution

Copyright (c) 2000, 2012, Oracle and/or its affiliates. All rights reserved.

Oracle is a registered trademark of Oracle Corporation and/or its
affiliates. Other names may be trademarks of their respective
owners.

Type 'help;' or '\h' for help. Type '\c' to clear the current input statement.

mysql>
細 かいパラメータの調整などもありますが、ひとまずこれでMySQLを動作させることができます。
Railsアプリケーションの作成
テスト用Railsアプリケーションを作成します。
Railsアプリケーションの作成
Rails用に設定したApacheのドキュメントルート(/Users/xxxxx(ユーザ名)/www/)へ移動し、Railsアプリケーションを作成します。アプリケーションの名前はtestappとし、-dオプション(データベース指定用のオプション)にmysqlを指定します。
testappディレクトリが作成され,その中にRails用のサブディレクトリやファイルが生成されます。
% cd /Users/xxxxx(ユーザ名)/www
% rails new testapp -d mysql
Rails用のMySQLの設定
データベースの設定をするには,先ほど作成されたschedule/configディレクトリ内のdatabase.xmlファイルにrailsから接続するためのmysqlのデータベース名、ユーザ/パスワードを記載します。
ここではrailsというユーザを指定しています。
% cd /Users/xxxxx(ユーザ名)/www/testapp/config
% vim database.yml
### 修正
development:
  adapter: mysql2
  encoding: utf8
  reconnect: false
  database: testapp_development  <-確認
  pool: 5
  username: rails    <-環境に合わせて記載
  password: rails    <-環境に合わせて記載
  socket: /tmp/mysql.sock
Railsアプリケーションで利用するデータベースを作成します。 database.xmlに定義されているデータベース名(ここではtestapp_development)と同名のデータベースを作成します。
% mysql -u root -p
Enter password:
Welcome to the MySQL monitor.  Commands end with ; or \g.
Your MySQL connection id is 39
Server version: 5.5.29 Source distribution

Copyright (c) 2000, 2012, Oracle and/or its affiliates. All rights reserved.

Oracle is a registered trademark of Oracle Corporation and/or its
affiliates. Other names may be trademarks of their respective
owners.

Type 'help;' or '\h' for help. Type '\c' to clear the current input statement.

mysql>
mysql> create database testapp_development default character set utf8;
Query OK, 1 row affected (0.00 sec)
mysql> show databases;
+---------------------+
| Database            |
+---------------------+
| information_schema  |
| mysql               |
| performance_schema  |
| test                |
| testapp_development |
+---------------------+
5 rows in set (0.01 sec)
MySQLにRailsから接続用のユーザを作成します。 ここではrailsという名前のユーザを作成します。
※接続ユーザは特になんでも構いませんが、database.xmlで設定したものと同様にしておきます。
mysql> grant all on test_development.* to 'rails'@'localhost';
Query OK, 0 rows affected (0.01 sec)
mysql> set password for 'rails'@'localhost' = password('rails');
Query OK, 0 rows affected (0.00 sec)
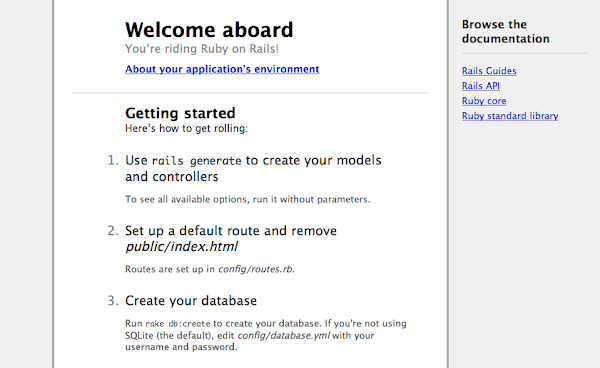
ここまでで、以下URLにアクセスすると、Railsの初期ページが表示されます。
http://localhost/testapp/public/
"About your application’s environment"を押下し、以下のような表示がされればデータベースへの接続などに問題がないことになります。
おわりに
以上で、Mac OS X 10.7.5(LION)でのRails環境を構築できました。
とは言え、まだまだわからないことも多いのでこれから勉強していこうと思います。

